
Programming With RobotBASIC
By John Blankenship
Programming can be the basis for many fantastic low-cost projects for hobbyists. Such projects can be just as challenging and exciting as hardware-based projects since you must precisely define the problem and analyze it in detail in order to identify potential solutions. Furthermore, if simulation is used appropriately, everything used/learned in the programming project can often be applied directly to hardware.
If programming offers so much value, the logical question is why is it seldom used by so many novice hobbyists. One reason is that most modern computer languages are designed to provide experienced programmers the power and conciseness needed for solving massive problems – not the intuitive, easy-to-use features needed by beginners that are new to programming.
Introductory languages may seem like a good idea, but they seldom have the power to address meaningful problems. This often gives beginners a bad start and makes it less likely they will want to learn more about programming even when future projects demand it.
The solution is to utilize a full-featured, yet easy-to-use, language as a programming tool.
RobotBASIC is such a programming language. It includes legacy-style commands that make it easier for beginners, but it also has more powerful commands for solving complex problems. It even allows some C-style syntax to be intermingled with the super-easy BASIC syntax, which can make it much easier to transition to cryptic languages like C and Java.
RobotBASIC ahas many commands for programming video games and simulations. In addition, RobotBASIC has an integrated robot simulator that lets you learn how to program robotic behaviors without the expense of a real robot. More advanced hobbyists can also control real robots with programs developed on the simulator. Best of all, RobotBASIC is free. There are no purchasing costs, no upgrade fees, no site licenses – EVER!
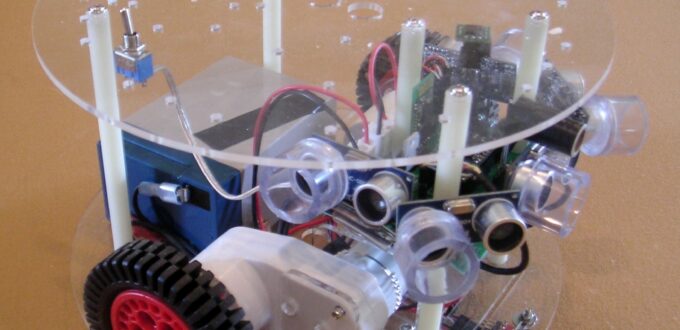
Lets start with a simple example that shows just how easy it is to program with RobotBASIC. Figure 1, produces the output shown in Picture 1.
- LineWidth 10
- SetColor RED
- Line 0,0,400,400
- SetColor GREEN
- Line 400,250,650,300
- end
Figure 1: This program introduces some graphic commands.
Picture1: The program in Figure 1 produces this output.
At this point, a simulated robot can be created at a specific x,y position on the screen with an rLocate statement and then moved around with rTurn and rForward statements. The rTurn command tells the robot to rotate around its center a specified number of degrees while rForward moves the robot forward or backward a specified number of pixels. Assume the goal now is to move the robot from one side of the red line to the other.
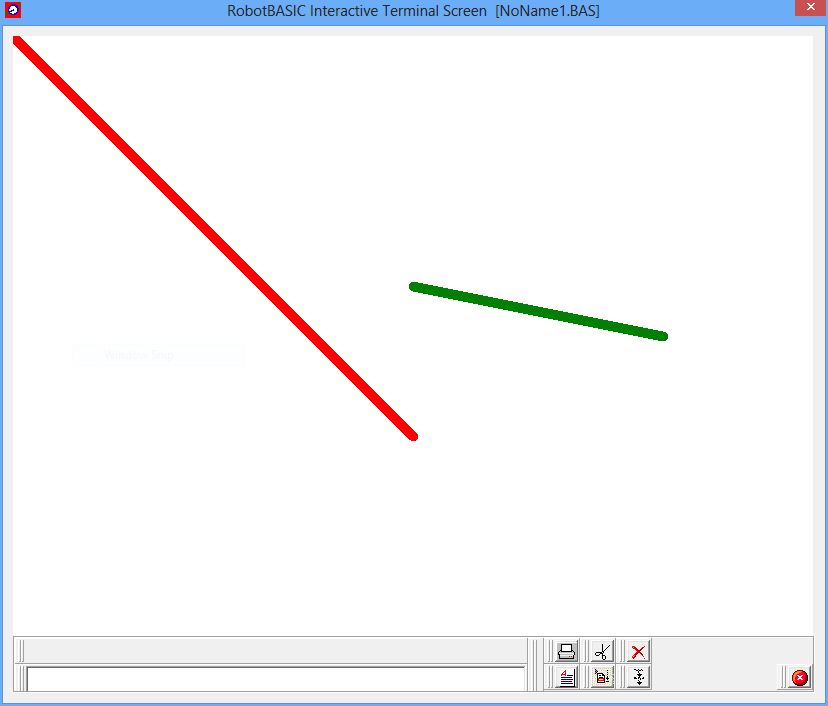
This can be done with a program such as the one in Figure 2, which is unsuccessful because the robot collides with one of the lines, causing an error as shown in Picture 2. After a few attempt like this one, even a beginning programmer should have no trouble moving the robot to the opposite side of the line. Notice, in this example, that special commands dropped a pen so that the robot leaves a trail to make it easy to see its actions. The color used for the trail is declared invisible so that it will not be seen as an object that can obstruct its movement.
- LineWidth 10
- SetColor RED
- Line 0,0,400,400
- SetColor GREEN
- Line 400,250,650,300
- LineWidth 3
- rLocate 200,300
- rInvisible LightBlue
- rPen DOWN
- rTurn 100
- rForward 100
- end
Figure 2: This program lets the robot leave a trail as it attempts to move around the line.
Picture 2: When the program in Figure 2 fails, it produces this error.
Figure 3 shows one variation of a finished program that locates the robot on the left side of the line and moves it to the right side. This program is getting longer, but it is still easy to understand, even for younger students.
- LineWidth 10
- SetColor RED
- Line 0,0,400,400
- SetColor GREEN
- Line 400,250,650,300
- LineWidth 3
- rLocate 200,300
- rInvisible LightBlue
- rPen DOWN
- rTurn 100
- rForward 40
- rTurn 40
- rForward 200
- rTurn -40
- rForward 100
- rTurn -90
- rForward 100
- rTurn -50
- rForward 100
- rTurn -30
- rForward 80
- rTurn 30
- rForward 50
- end
Figure 3: This program successfully moves the robot to the opposite side of the line as shown in Figure 6.

Picture 3: The robot has successfully moved to the other side of the line.
This assignment may not be very exciting for seasoned robot hobbyists, but beginners with no programming experience find it a pleasing simple way to get started with programming.
The next step is to introduce the simulated robot’s sensor capabilities so that the robot can be programmed to make its own decisions on how to accomplish a task. The simulated robot has two levels of perimeter proximity sensors, an electronic compass, a beacon detector, a color detecting camera, and many other sensors making it possible to create meaningful, exciting applications. Let’s look at a simple example to illustrate how the sensors can be used.
Assume that we want to program the robot to follow a line on the floor. The simulated robot has three line sensors mounted at its front edge that can be read with the function rSense(). One very easy approach for making the robot follow the line is to have it turn to the right whenever any of the sensors sees the line, and to turn back to the left when no line is seen. While this is not a sophisticated algorithm, it does work reasonably well as long as the line does not have sharp angles and is not too thin.
The program in Figure 4 will create a line and let the robot follow it as shown in Picture 4. Notice that this program uses functional modules called subroutines that shows how to better organize a program’s structure. The main program simply executes each of the modules in the order they are needed by calling them with a gosub statement. Notice also that the program introduces decision-making structures with the IF statement and to loops created with the WHILE statement. The FollowLine module uses a loop to continually move the robot forward constantly turning it right and left depending on whether the rSense() function detects the line.
- MainProgram:
- gosub DrawLine
- gosub InitializeRobot
- gosub FollowLine
- end
- InitializeRobot:
- rLocate 400,500
- rInvisible green
- return
- DrawLine:
- SetColor green
- LineWidth 10
- Line 400,500,400,450
- LineTo 420,400
- LineTo 400,350
- LineTo 380,300
- LineTo 380,250
- LineTo 350,200
- LineTo 320,150
- return
- FollowLine:
- while true
- rForward 1
- if rSense()=0
- rTurn -1
- else
- rTurn 1
- endif
- wend
- return
Figure 4: This program, which allows the robot to follow a line, is organized into functional modules called subroutines.

Picture 4: Notice that the robot follows the line by staying on its right side.
Additional programming statements can be used to make the robot to react to individual readings of each of the robot’s line sensors. This makes it possible to follow curvier and thinner lines. It is important to emphasize that programs developed on the simulator can be used to control real robots such as the RB-9 shown in Figure 9 available from RobotBASIC. RobotBASIC also offers RROS chips that make it easy to build your own low-cost, RobotBASIC-compatible robots. Download the RROS Manual for more details on how you can built a RROS-based robot.
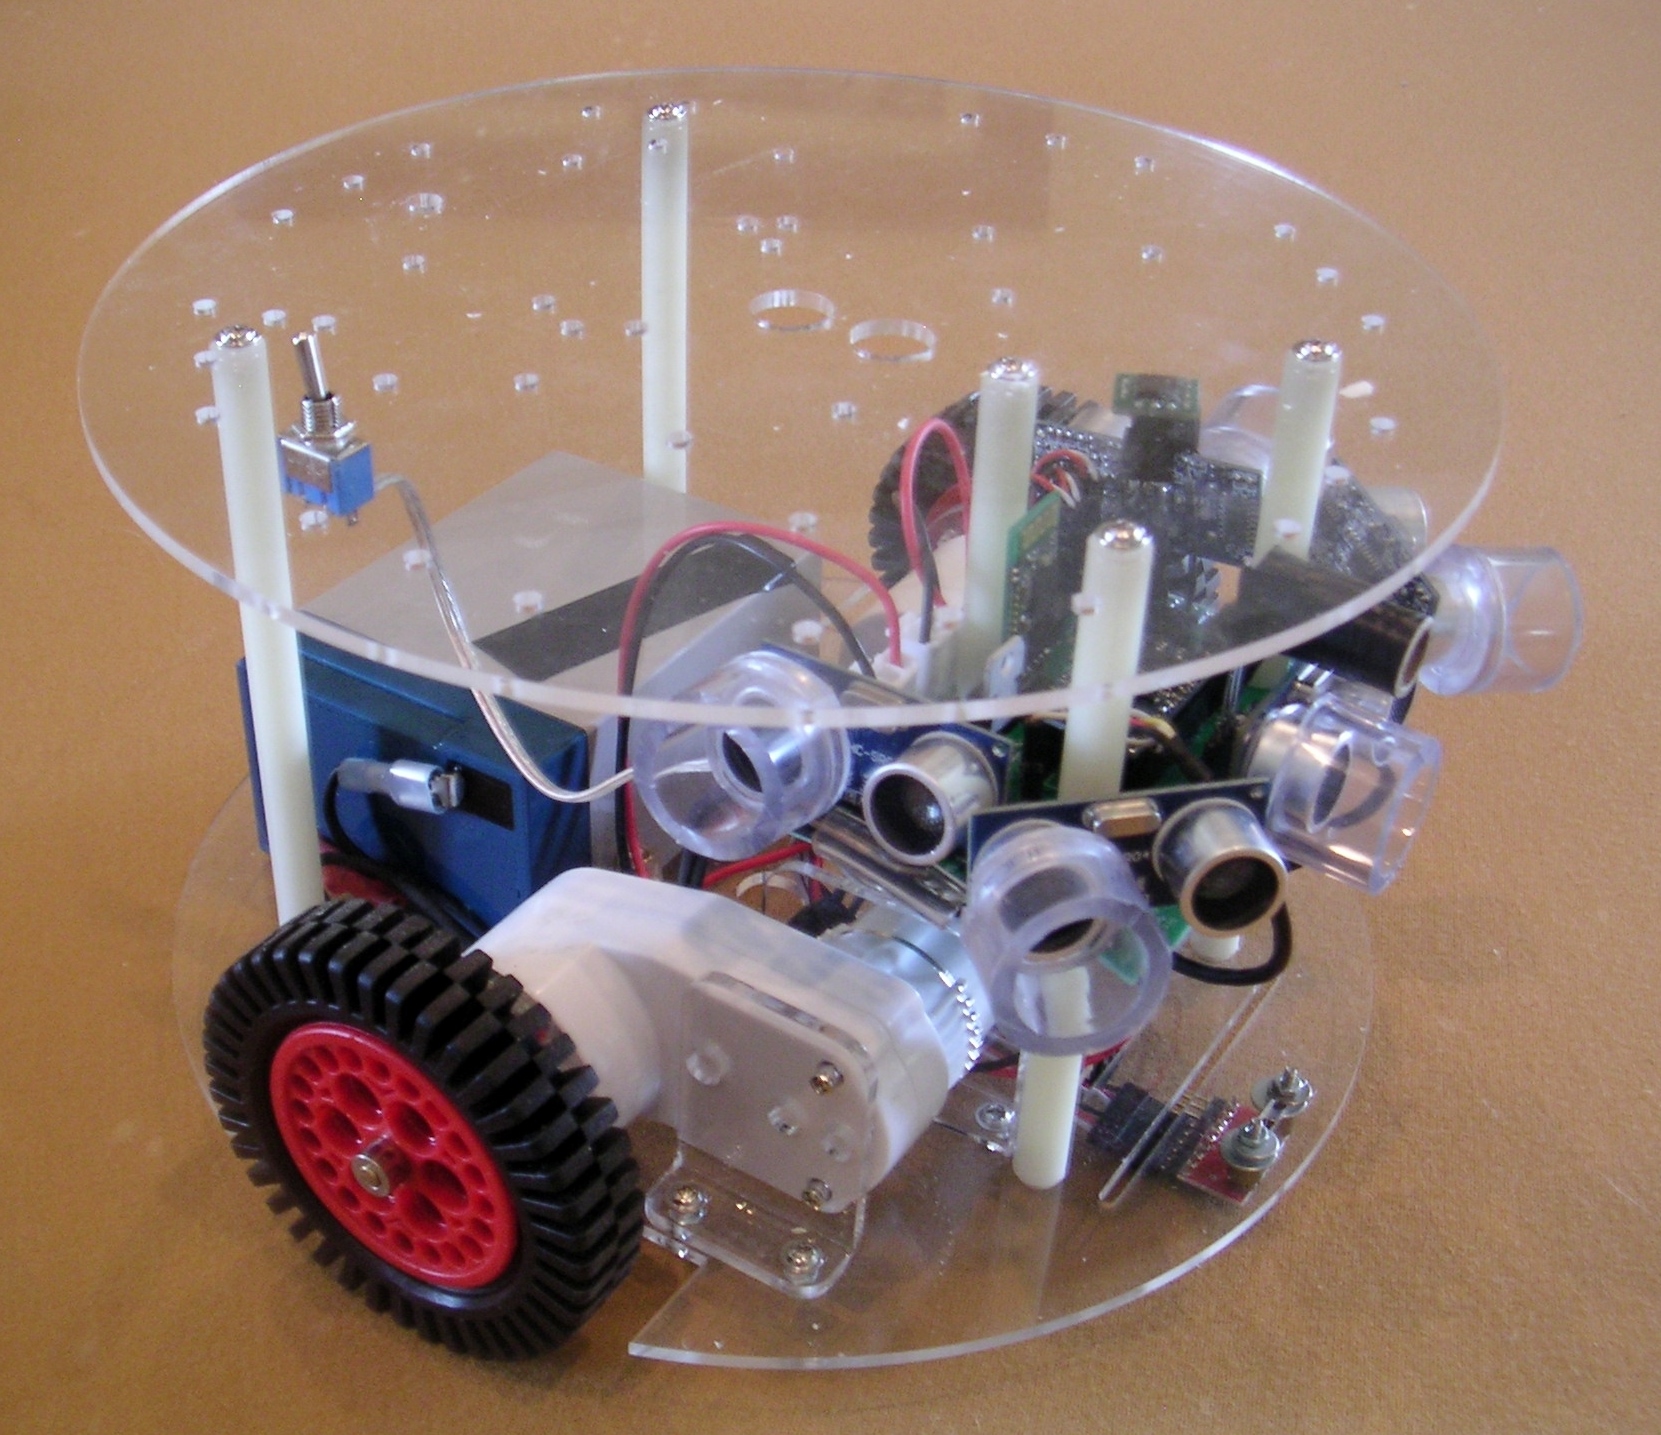
Picture 5: This RB-9 robot has most of the sensors of the simulated robot, allowing it to be controlled by the same programs developed on the simulator.
It is important to realize that RobotBASIC is also capable of creating other types of simulations such as the effects of wind and gravity on a bouncing ball for a science or physics class. The details of programming the effects of gravity on a bouncing ball are covered in the book RobotBASIC Projects for Beginners. It and many other books on RobotBASIC are available from Amazon.com (just search Amazon for RobotBASIC).
Visit http://www.robotbasic.org to download your free copy of RobotBASIC.